

Who remembers making Salt Dough Ornaments? I'm sure many of you do. I remember my mama making some when we were small. Years and years later I made lots and sold them as well as my clay ornaments. They were simple and inexpensive to make but so pretty.
I'm sure you may have seen these online.
They are simple and pretty.
They are simple and pretty.

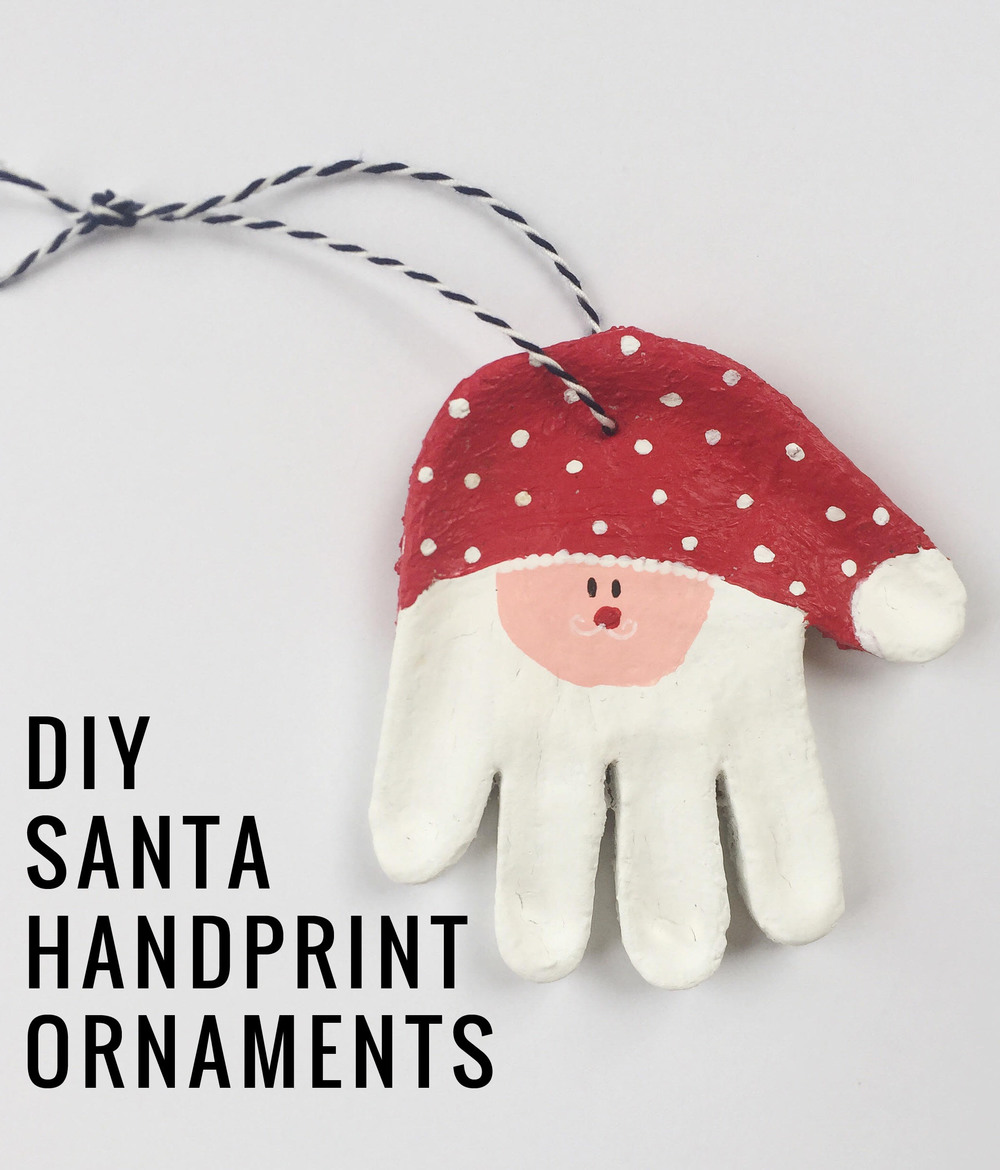
Oleander and Palm Christmas Ornaments credit
video below
Recipe for Salt Dough
- 2 Cups Flour
- 1 Cup Salt
- 1 Cup Water
You will need
- Gallon Plastic Zip Lock Bag: to hold salt dough and keep moist.
- Cookie Cutters or glass
- Optional: Stamps and Stamp Ink Pads Stamp Ink Colors your choice
- Optional: Food Coloring or Acrylic Paints
- Wax or Parchment Paper
- Rolling Pin
- Oven for baking
- Cookie Sheet covered with parchment paper or aluminum foil to prevent sticking
- Clear Acrylic Mat, Satin or Gloss Pray or Varnish, you decide the finish you would like on your project. (Use well ventilated space to spray or do so outside).
- Drinking Straw for your hole to be used for threading twine, ribbon or thread to hang the ornament
Some Design Choices:
- Stamp design if you wish with stamp with colored inks of your choice then bake. Note* Press just hard enough to get the design but not too hard because you don't want that ring around the design.
- Add Food Coloring to the water then to sections of the salt dough Before baking for beautiful pastel color results
- Use white dough bake ornaments then when cooled paint with acrylic paints and seal with acrylic sealer.
Love this Starfish Garland idea below from Desperate Craftwives
You can make so many things for any number of uses.

photo credit and instructions

Snowflake Gift Ornaments from Just Crafty Enough credit and the DIY instructions
- Work with a small amount at a time to prevent drying out. Keeping rest in bag.
- Place your wax or parchment paper on surface
- Place a piece of dough on top
- Cover with another piece of paper
- Roll dough evenly 1/8 to 1/4 inch thick
- Bake in oven set at 250 degrees for approximately 3 hours. It may take a little longer but watch closely at the 3 hour time to make sure it doesn't brown around the edges or even burn. You wouldn't want that to happen it isn't pretty.
- Spray when cool with the acrylic sealer. This seals/protects and gives a good finish.
I thought I'd share these videos to help you just in case you've never made salt dough ornaments before.
The first one is from Oleander and Palm which shows how she makes them.
LINKS FOR MORE

This is as always a traditional fun way of making something creative and memories! Have fun!

I love these, we made them when I was a child and my mom still has some painted ones on her Christmas tree. I want to do this with Taylor this year! Thanks
ReplyDeleteI want to make some more too! It has been so many years since I have made them. They are really pretty. I don't know why I quit. Share with us yours when you two make them Kathy!
DeleteI never had any idea on how to make these. Very cute. Some look good enough to eat tho. :-)
ReplyDeleteI haven't made any in years but these were so pretty online thought I'd share and remember the years when I did make them with the kids.
Delete