

I love white, off white colors.you can add, and change with just an accent of color anytime you wish.
I love Ballard Designs and shop there quite often but I wanted this item quickly so decided to make mine a fabric rag wreath. Their design is paper flower and gorgeous but I love fabrics of all kinds.
Join me today for a simple tutorial.
Join me today for a simple tutorial.

Catie had some large Styrofoam sheets leftover from Halloween. So I took the hard but free route and cut my circles out from a salad plate then took a biscuit cutter with long handle to cut the center
You will need to sand where you cut the styrofoam and use Mod Podge to seal the edges that you cut.
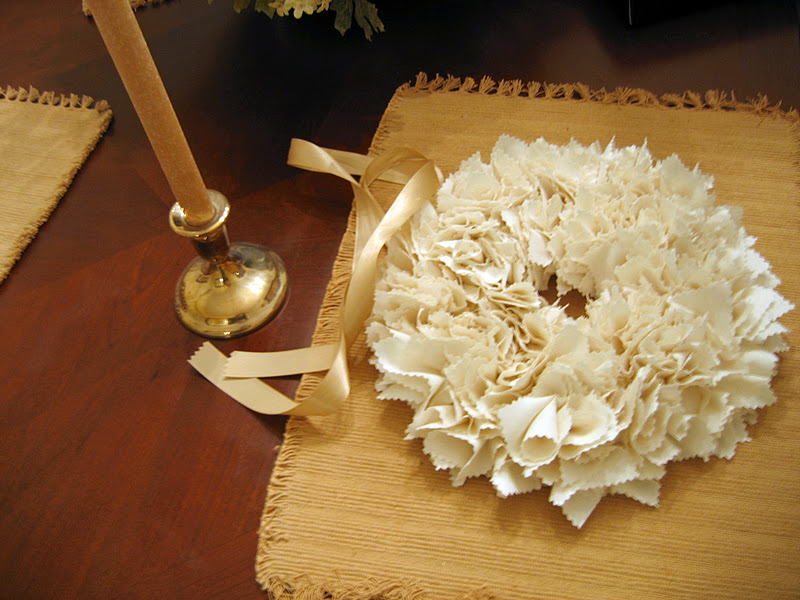
You certainly can buy your styrofoam wreath forms and have less of a hassle. Buy the size you want, mine is 9 inches wide diameter total and 3inches all around to add fabric. Finished wreath with fabric is around 12-13 inches.
Optional:
If you want to cover the back of wreath you can use felt or I used Warm & Natural cotton batting. It will not fray and adds a softness and such a beautiful natural look.. Place the wreath form on the batting, trace around form, cut out. Add Glue to back of wreath form, place batting on now. Note ** Remember not to go to the sides of form cover the bottom only! The sides will have material punched in for a feathery look and will cover any edges of batting for a very clean look.


I have a bolt of muslin on hand so chose to use it.
Depending on the size of your wreath form and the thickness and stiffness of your fabric.
The amount of fabric will vary.
I used about 1 1/2 yard cut into 3 inch squares with pinking shears.
My wreath form turned out to be 9 inches before adding any fabric.
Size afterwards it was 12 1/2 inches wide.
Aleene's Tacky Glue I love it!
Open it and let it stay open at least an hour before use. Pour some in a paper plate or some container for use and it will get even tackier. It is so much easier to work with that way.

I use this stuff-it tool to make mine but a sharpened pencil will work just as good

Take your pencil or tool put into the middle of the 3" square
Dip into glue, then stick into styrofoam pull pencil out
Do this all around the wreath.
Use your judgement as to how close to put your squares of fabric
You want to cover wreath but you don't have to get carried away like I did.


Finished with fabric

Take a small paper clip bend like this
Stick the two ends in the tacky glue
Stick down into the edge of wreath that you want to hang with ribbon
Let it dry
OR
If you choose you can just use a long enough ribbon to run around wreath at top and tie to chair it is entirely up to you.

Take ribbon 5/8 inch wide and 12 inches long, tie in a knot at end put through paper clip hook
run loop through knot to make another knot to hang.
If you have fabric on your chair pin it hidden and that will just give the ribbon loop look you don't have to have a large bow. You just want to hang the wreath however you can on your own chair
I then took a 1 yard piece of 3/4 inch ribbon in same color and tied wreath to chair with that.
My chairs have openings.

kitchen chair

Link above to see in Hibiscus Table Setting.
Other Uses Below
Other Uses Below


Materials
If cutting your own from styrofoam sheet you will also need:
ModPodge
Fine Sandpaper
Knife to cut, or xacto knife, I used a steak knife
or
Purchased styrofoam wreath forms
Aleene's Tacky Glue
Pointed tool, or sharpened pencil
100 % cotton fabric for wreaths for my 9" diameter wreath I used 1 1/2 yards (this depends on the size you buy)
Pinking shears
5/8" wide good satin ribbon
small paper clips or wire for hanging

These are so easy to make and great for #spring decorating via @DollyTeresa #DIY #homedecor https://t.co/uTgygFxYX5 pic.twitter.com/0U90ygcHZR— Hometalk.com (@Hometalk) March 22, 2016
Gorgeous! Did you cover the back at all?
ReplyDeleteSusanne, thank you so much for asking this I left it out of the instruction. It is there now...Thanks for the sweet compliment!
ReplyDeleteThis is so pretty Dolly! And, what a pretty plate you dipped your glue in! :)
ReplyDeleteThank you so much Deb!
ReplyDeleteReally sweet wreath and tut! Thanks for sharing :D
ReplyDeleteVisiting from French Country Cottage linky party today,
~Suzanne in NW Illinois
Merry Christmas!
Thanks, Merry Christmas..
ReplyDeleteThat turned out absolutely BEAUTIFUL!!!
ReplyDeleteI love it!
And I would love it if you'd stop by for a visit!
~Abbie (www.fivedaysfiveways.com)
Thank you Abbie! I did stop by and am now following you. Love your writing and creativity!
ReplyDeleteI love this idea for a wreath! Very inspiring.
ReplyDeleteSherry's Bees Nest
Thanks Sherry!
ReplyDeleteI love this idea! I had no idea it was this easy!Thanks for sharing!
ReplyDeleteKaren thank you for visiting.
ReplyDeleteI have been admiring that Ballard Designs wreath for awhile now... But I am LOVING your version! :)
ReplyDeleteWould love for you to link up @ Find Your Craft Friday over on my blog! Have a great Friday!
Emily @ BabyBerry
http://weinzapfelbabyberry.blogspot.com/
Hi Emily,I did just that linked up @ Find Your Craft Friday, thanks for hosting it..Have a great weekend.
ReplyDeleteDolly! This is gorgeous! I have pinned it! Love this blog!
ReplyDeleteWould love it if you shared with Home and Garden Thursday later tonight!
Kathy
Hi Kathy, Thank you so much! I appreciate your sweet compliments. I have shared on your Home and Garden Thursday. Thank you for hosting that to might I add! Dolly
ReplyDeleteLove your rag wreath and I think it was so ingenious of you to make your own wreath form from some Styrofoam you had on hand!
ReplyDeleteThis is beautiful!
ReplyDeleteThank you Manuela and Teresa for your sweet comments!
ReplyDeleteGosh, I had forgotten how pretty rag wreaths are! Yours is truly beautiful with the muslin! :)
ReplyDeleteThanks Candy!
ReplyDeleteI really am going to try this - it is so gorgeous - thanks for the great tutorial! Love it! Thank you for sharing with Home and Garden Thursday,
ReplyDeleteKathy
A great tutorial!
ReplyDeleteBig Hugs
Charo
It looks so elegant with the ribbon and on that fabulous chair! Great tutorial:)
ReplyDeleteWhat a gorgeous wreath! You are so creative!! I am happily following from Debbie's newbie party. I hope you will follow me, too! Many blessings to you!
ReplyDeleteAtelier Thanks for coming by!
ReplyDeleteMichelle Thank you for your sweet compliments!
Shenita, Thank you so many compliments...I am glad you are here I follow you already but through Hibiscus House... bless you.
Dolly
I love the wreath! Found you from Debbie Doos newbie party.
ReplyDeleteLove the wreath. Must try to make one. I tore some muslin stips for Christmas packages and it was very pretty. Liked the frayed edges. Hope you will come visit Timeless Treasures. http://audreyzumwalt.blogspot.com/
ReplyDeleteBlessings. Audrey Z.
Hi Margaret! Thank you and I have just found your two blogs and am following you.
ReplyDeleteDolly
Hi Audrey, Just went to your blog and like it am now following you. I'll bet your packages were pretty with the torn muslin. I have torn the muslin for these wreaths for a rustic look. For Christmas I wanted a more finished look so I pinked the edges.. So nice to meet you all.
ReplyDeleteKathy I hope I emailed you sorry didn't mean not to answer you on here. Thank you so very much for your compliments and for hosting Home and Garden Thursday! It is so much fun to see all of the talented links.
ReplyDeleteDolly
Not only lovely but versatile! I'm a new follower, please drop by for a visit when you can.
ReplyDeleteThank you Sherry! I sure will pay you a visit!
ReplyDeleteSo pretty Dolly. I think yours is prettier than Ballard's! I love the natural muslim you chose to use! This is my first visit, over from Debbie Doo's. I'll be back!
ReplyDeleteWell thank you so very much Jeanne! It is a pleasure to meet you. I am now going to visit you. Come back anytime.
Deletedolly
Beautiful! I love Ballard Designs!
ReplyDeleteI'm hosting a winter theme linky party and would love for you to post this! www.serendipityandspice.blogspot.com
-Melissa
Hi Melissa and thank you so much. I did put the wreath on your link and thanks for the invite. I am now following you.
Deletedolly
This is awesome. What a great tut too! Thanks for linking up to my newbie party. I do not see my link or button anywhere though, please add it..thanks!
ReplyDeleteSorry Debbie, I sure didn't mean to do that. Thanks for the compliment, and for the link.
DeleteLove it! How simple and pretty. :)
ReplyDeleteThank you very much Crystal!
DeleteBeautiful wreath ...!!
ReplyDeleteThank you Emreen!
ReplyDeleteThank you so much for having the party. This is so much fun. Love meeting new people and reading their blogs.
ReplyDeleteHi there! I came over from 2805. I love this! It's the perfect thing to use up my leftover fabrics. Yours is so pretty.
ReplyDeleteGlad I popped over- I'm following you. :)
~Tina
Hi Tina I am so glad that you did. Welcome and I now am going to visit you!
DeleteLove it! I made one of burlap and lace last Fall and find it to be so versatile. Thank you for sharing this fabulous post to Potpourri Friday!
ReplyDeleteI neeeeed to make one of these! Thanks for posting it again!
ReplyDeleteSherry's Bees Nest
So pretty! Reminds me of fancy coffee filter wreath. Thanks for linking to "Cowgirl Up!"
ReplyDelete:) Samantha @ Crafty Texas Girls
What a gorgeous wreath...gotta love muslin!! This is such an easy project yet so elegant. Thanks so much for sharing....I think I'll be making one soon!
ReplyDeleteI am your newest GFC and linky follower! I'd love for you to visit my blog and possibly follow back. Have a wonderful evening!
Marilyn
4you-withlove.blogspot.com
SO pretty!! Thanks for sharing on Show Off Saturday!
ReplyDeleteThank you for your contribution to our 'Time for a Party' link-up. I think this wreath feels like it has always been in your home. Seems to match everything.
ReplyDeleteTomorrow we'll open a NEW party at http://www.finecraftguild.com/party/ and we'd love to see you there then again with a beautiful project like this.
Till then! Keep up that great creativity!!!
That is so cute!!! I love it! I have a link party going on right now and would love for you to share this and anything else you would like! Hope you will stop by!
ReplyDeletehttp://twoyellowbirdsdecor.blogspot.com/2013/03/thursdays-temptation-58-fabulous.html
Jill